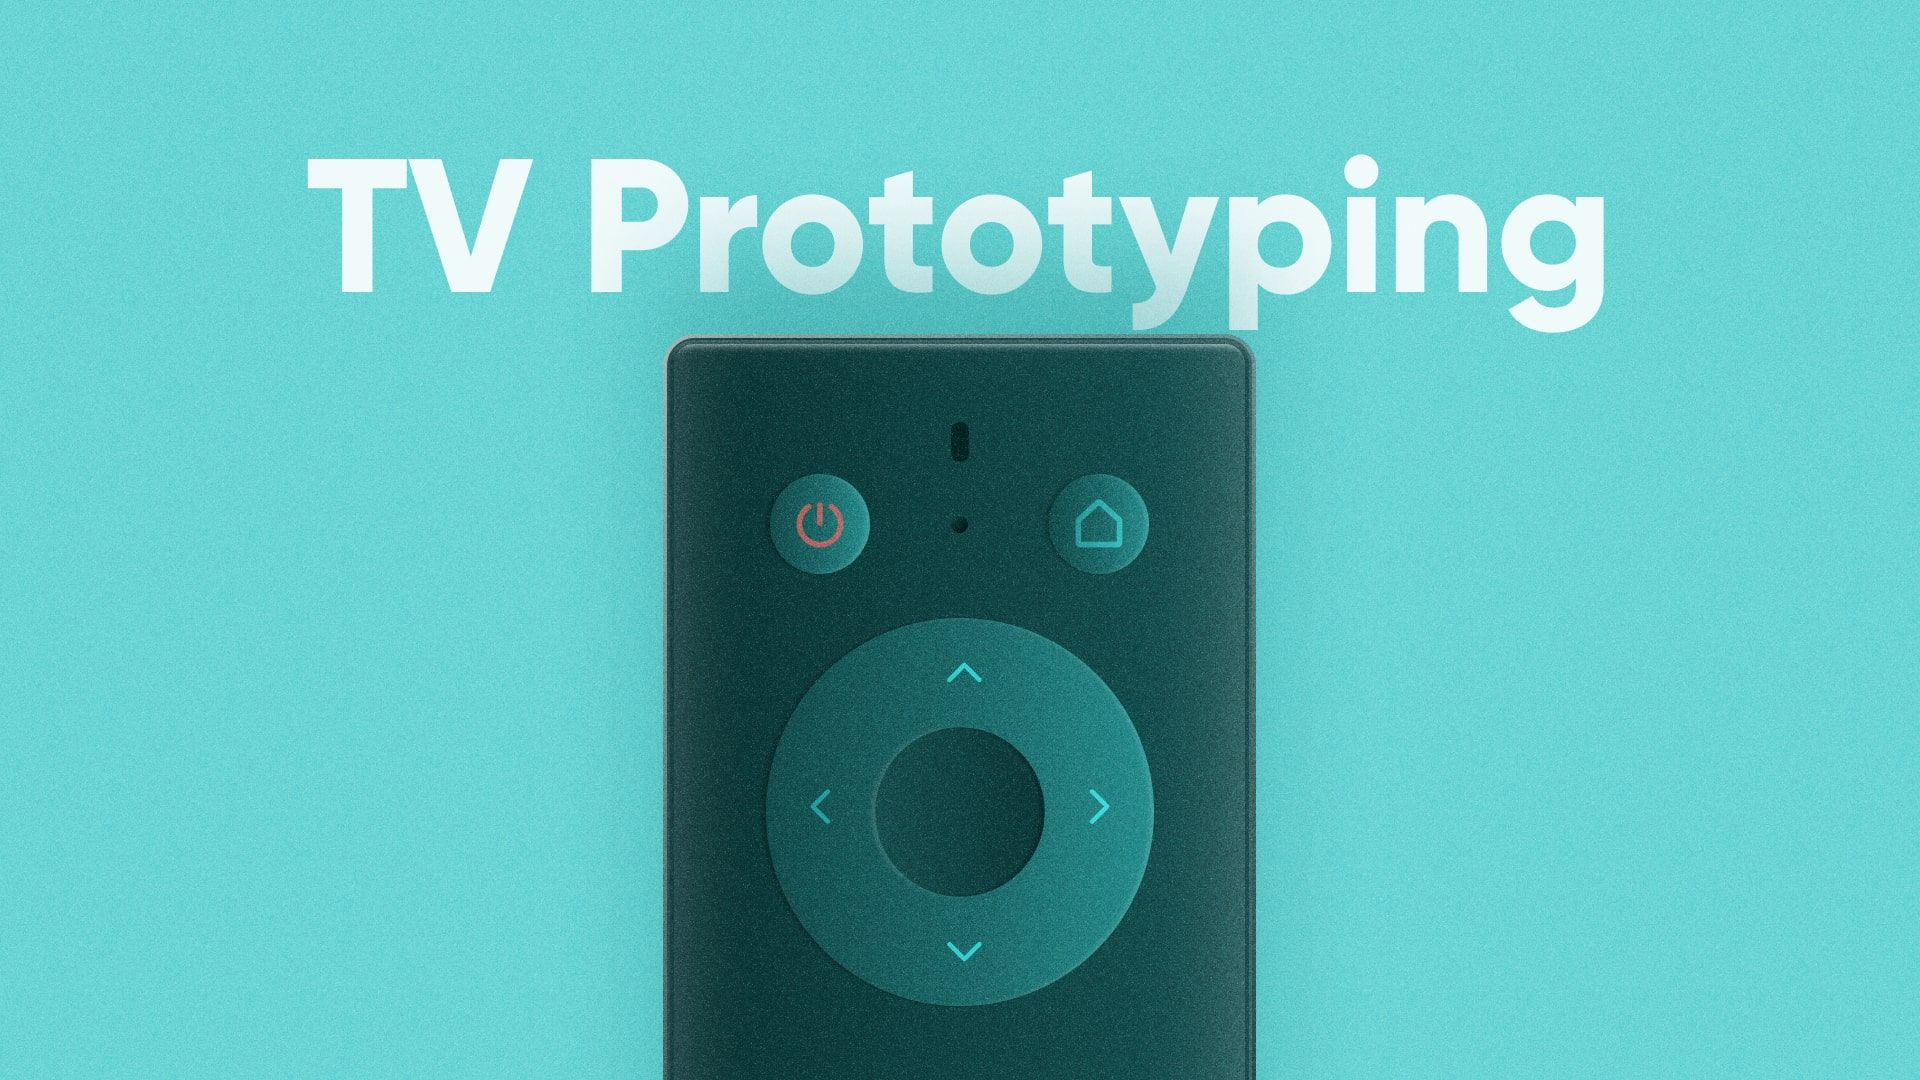
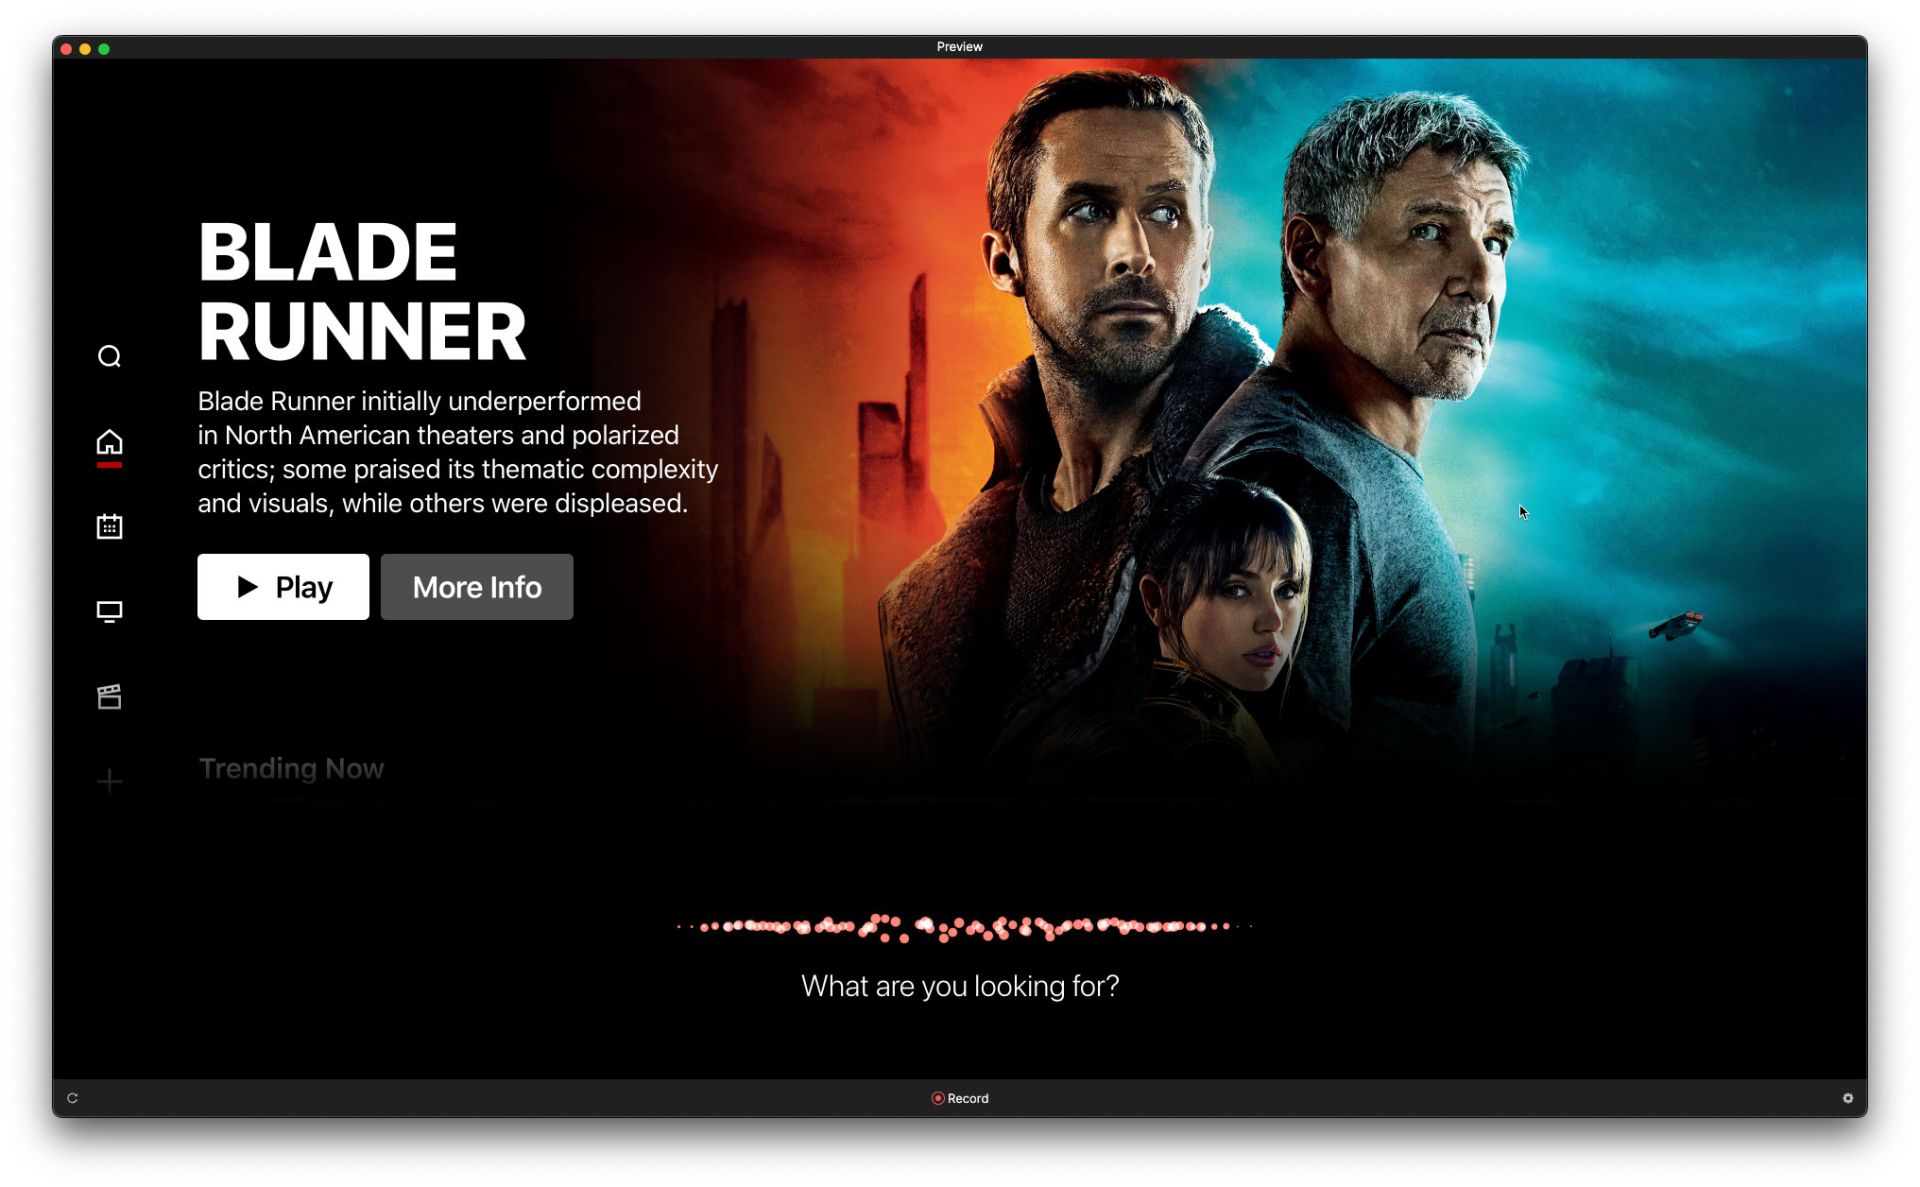
TV Prototyping Using Infrared Remote Control
Learn how to easily use any infrared remote control to create a true living room experience for your TV prototyping with ProtoPie.

Jeff Clarke, UX Designer & ProtoPie Educator
Oct 25, 2022
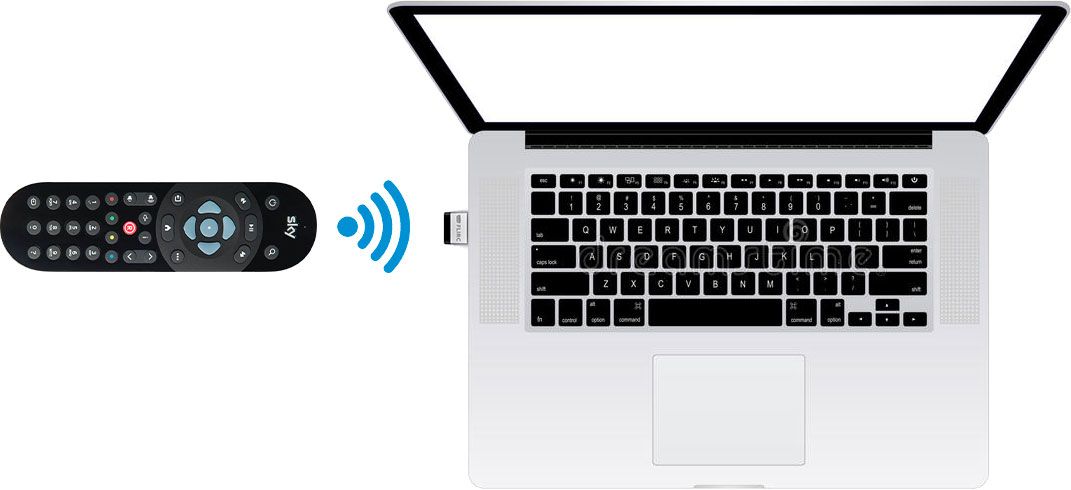
In TV prototyping it is common that you will want to set up a real-world experience where you can interact with your prototype using a physical remote control. This isn’t hard to do, but it requires purchasing an inexpensive USB infrared (IR) receiver, and following a few simple steps.
What you'll need
You won't need to spend a lot of money, but you will need to source a couple of things:
1. FLIRC USB infrared receiver
This is an inexpensive USB infrared receiver. To be clear there are other similar receivers that will work, but this is by far the easiest one to use. And at the time of this writing, it only costs $32 USD. You won’t find a better alternative.
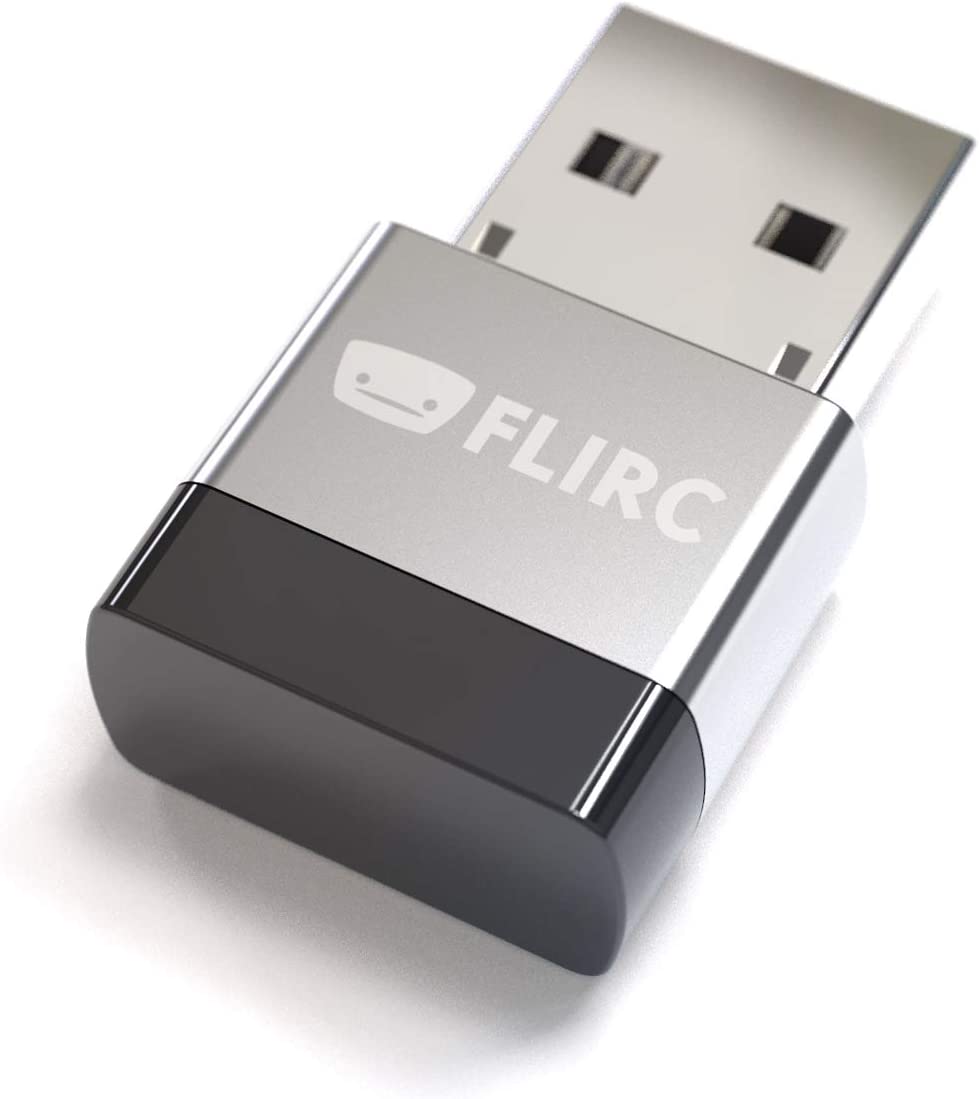
Purchase one here.
2. An infrared remote control
You can use ANY remote control with the FLIRC as long as it is an infrared (IR) type. These would include remote controls that come with all sorts of electronics — TVs, DVD and BlueRay players, Satellite and Cable TV boxes, etc… chances are you’ve got one lying around somewhere you can use.
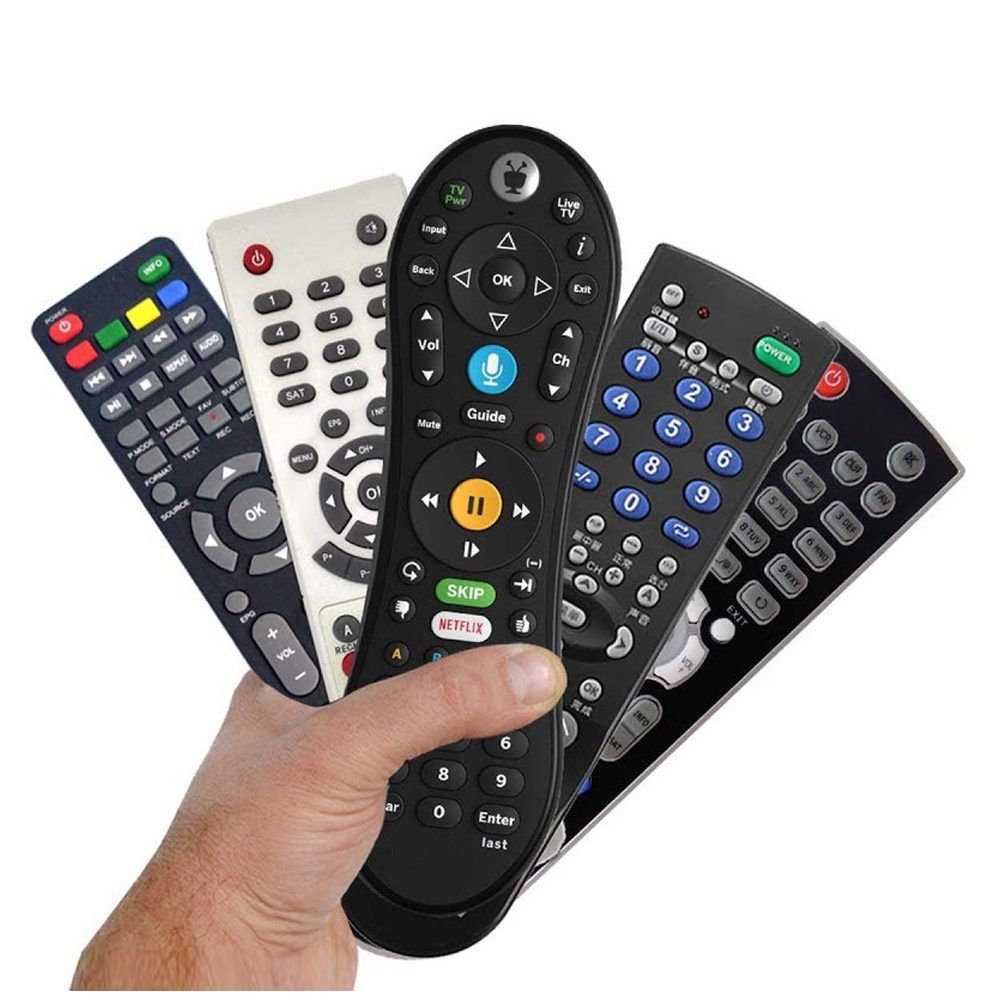
FLIRC works with ANY IR remote control. Chances are you've got one sitting around you can use.
Note that bluetooth remotes that come with the newest TVs won’t work. The FLIRC receiver doesn’t work with bluetooth, only IR.
If you don’t happen to have one handy, inexpensive universal remote controls that you can find on Amazon or at your local electronics store will work as well, like this one.
FLIRC — the company that makes the USB IR receiver I linked to above — makes an IR remote called the Skip 1s and it is designed to work with the FLIRC receiver. You can optionally purchase it bundled together with the FLIRC USB Receiver. At the time of this writing it is only available for pre-order, but it is expected to ship in Fall 2022.
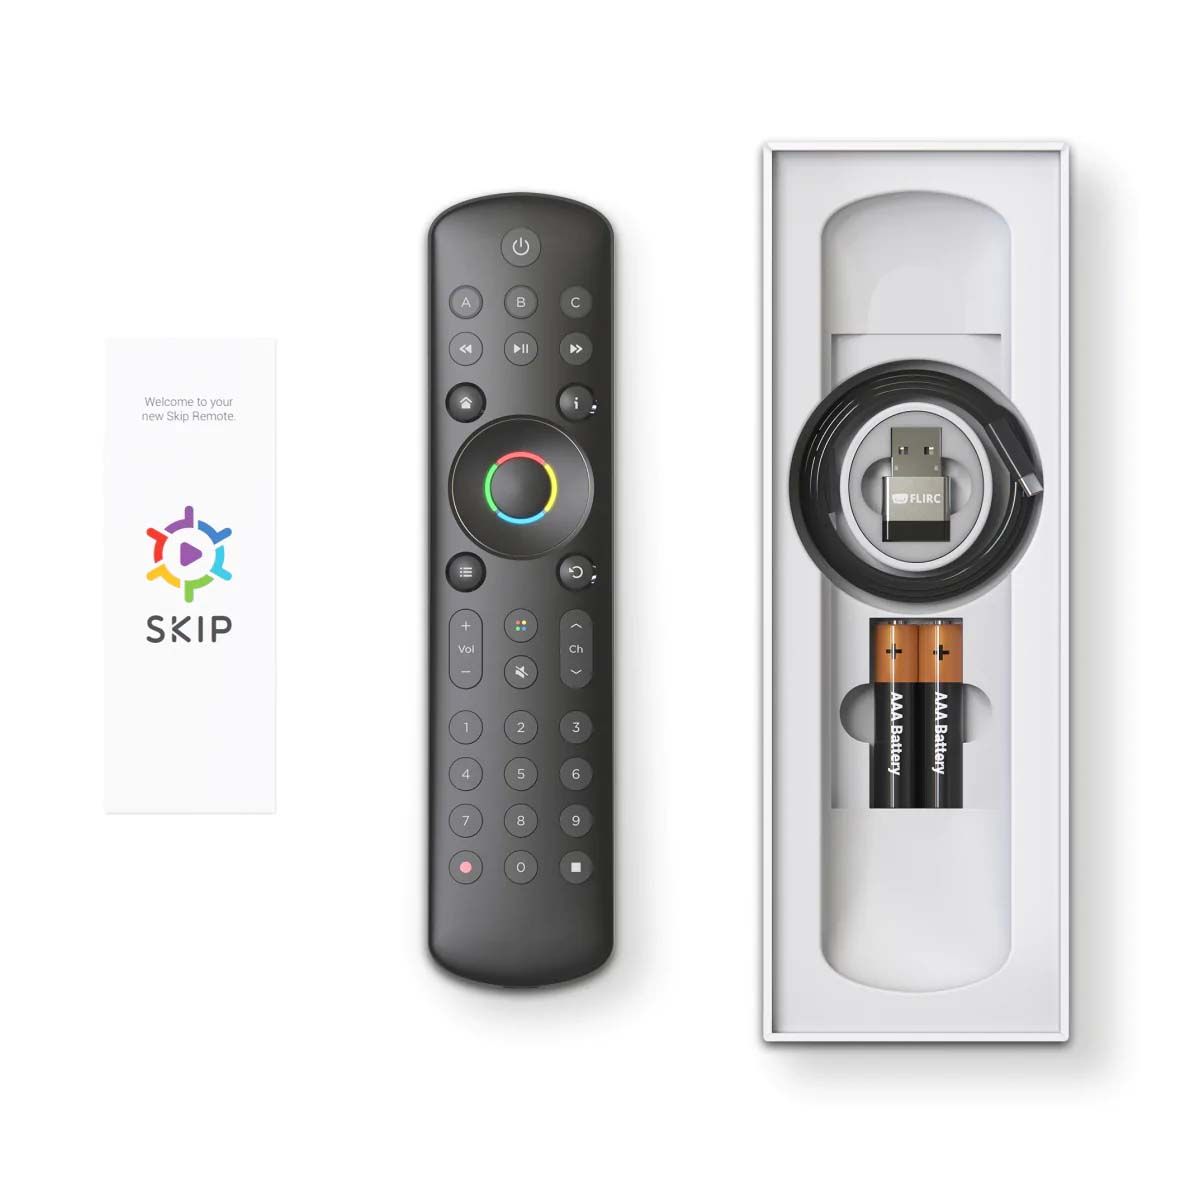
FLIRC Skip 1s, bundled with the FLIRC USB IR Receiver
Details here.
…and that’s all you need.
You configure your FLIRC with software you install on your computer. Once configured it translates button signals from your remote control into keyboard key presses. For example, you can map your remote control’s directional pad to the arrow keys on your keyboard.
From there it’s simply a matter of authoring your prototype to respond to keyboard commands.
Step By Step
Download the Pie File
We’ll be working with this Pie file. Download it and open it in ProtoPie Studio.
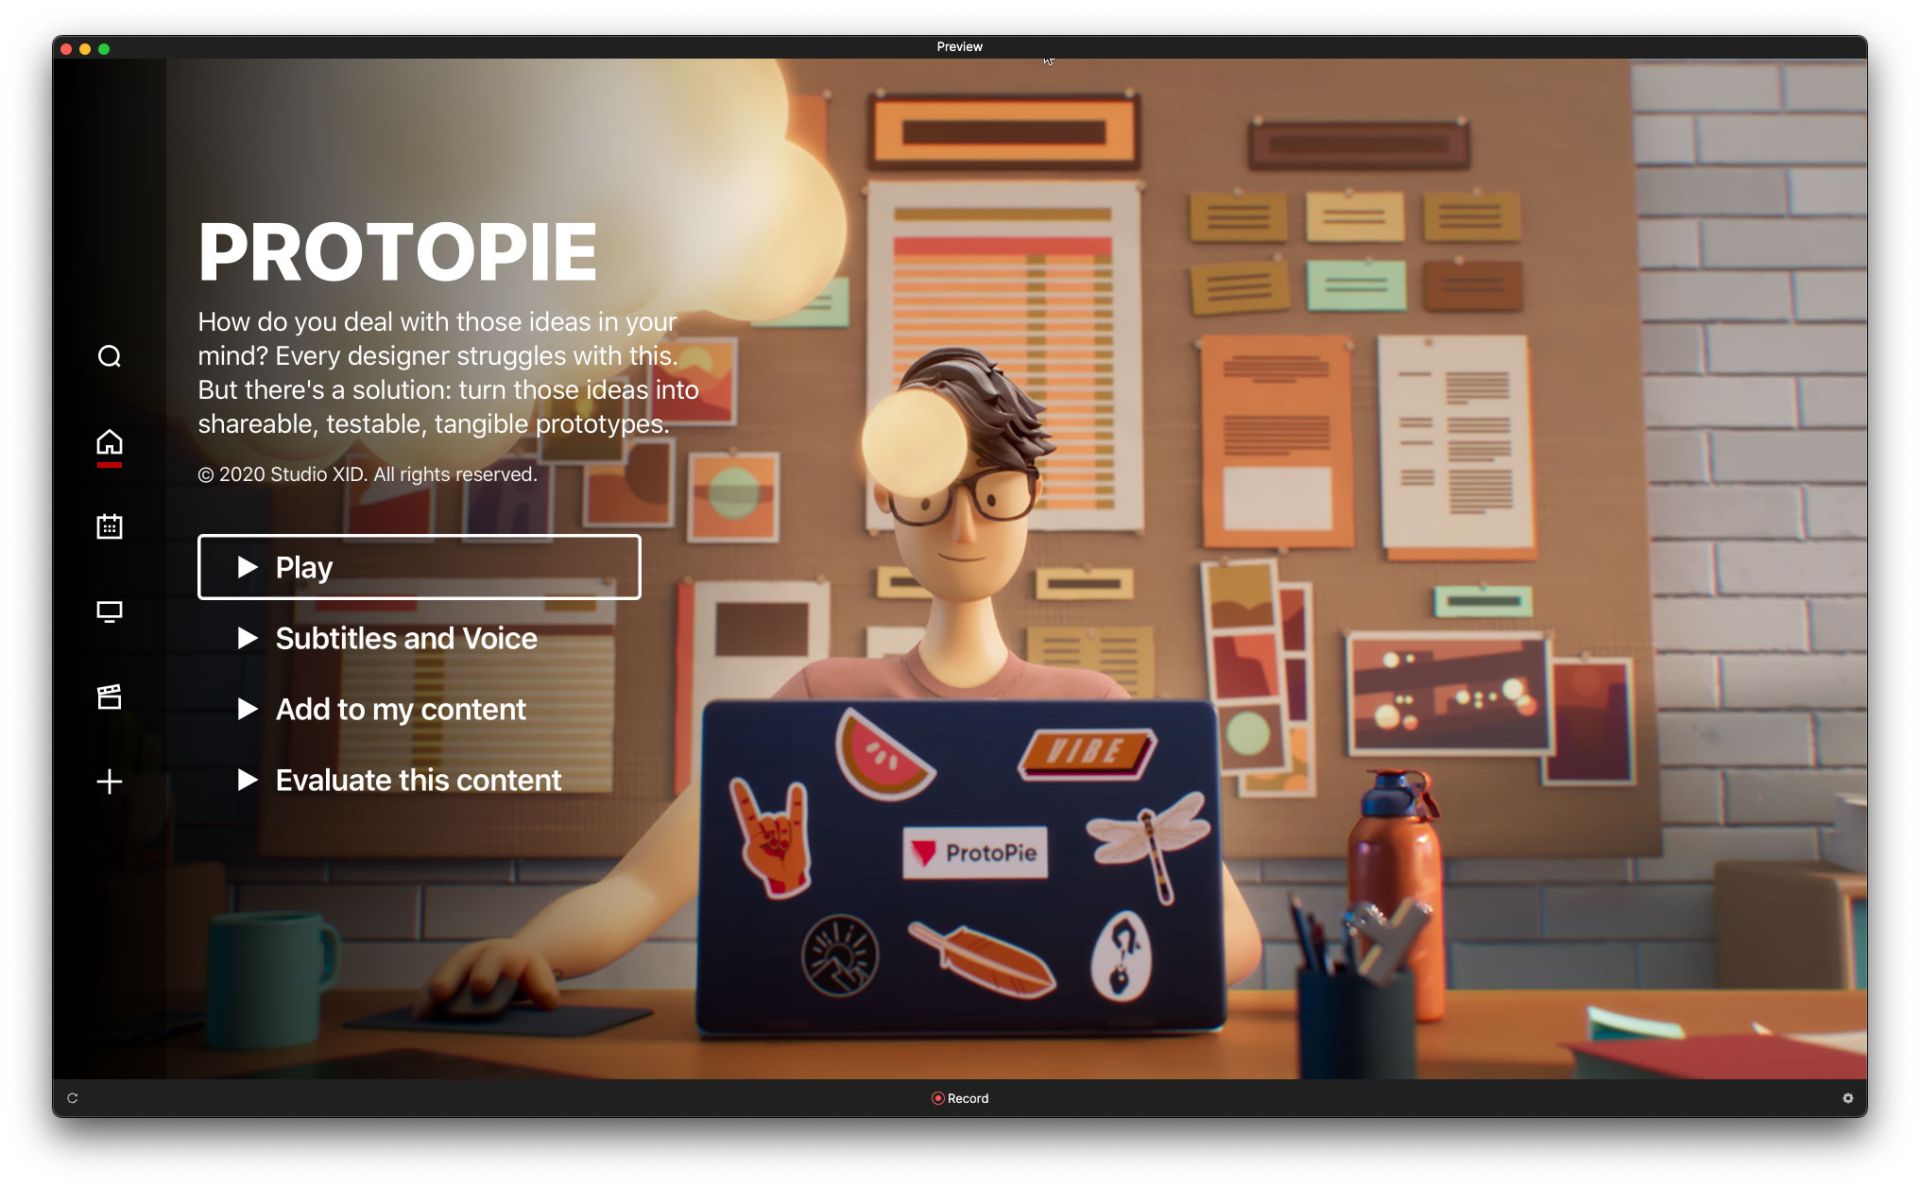
Preview it. You’ll see that it has been authored to respond to a number of keyboard key presses:
- In the first scene, it responds to the “V” keyboard key in order to start the voice assistant
Press “V” then answer the question by saying “Animation”
- In the subsequent scene, it responds to the left and right arrows to navigate the row of movie titles, and the Enter key is used to make a selection
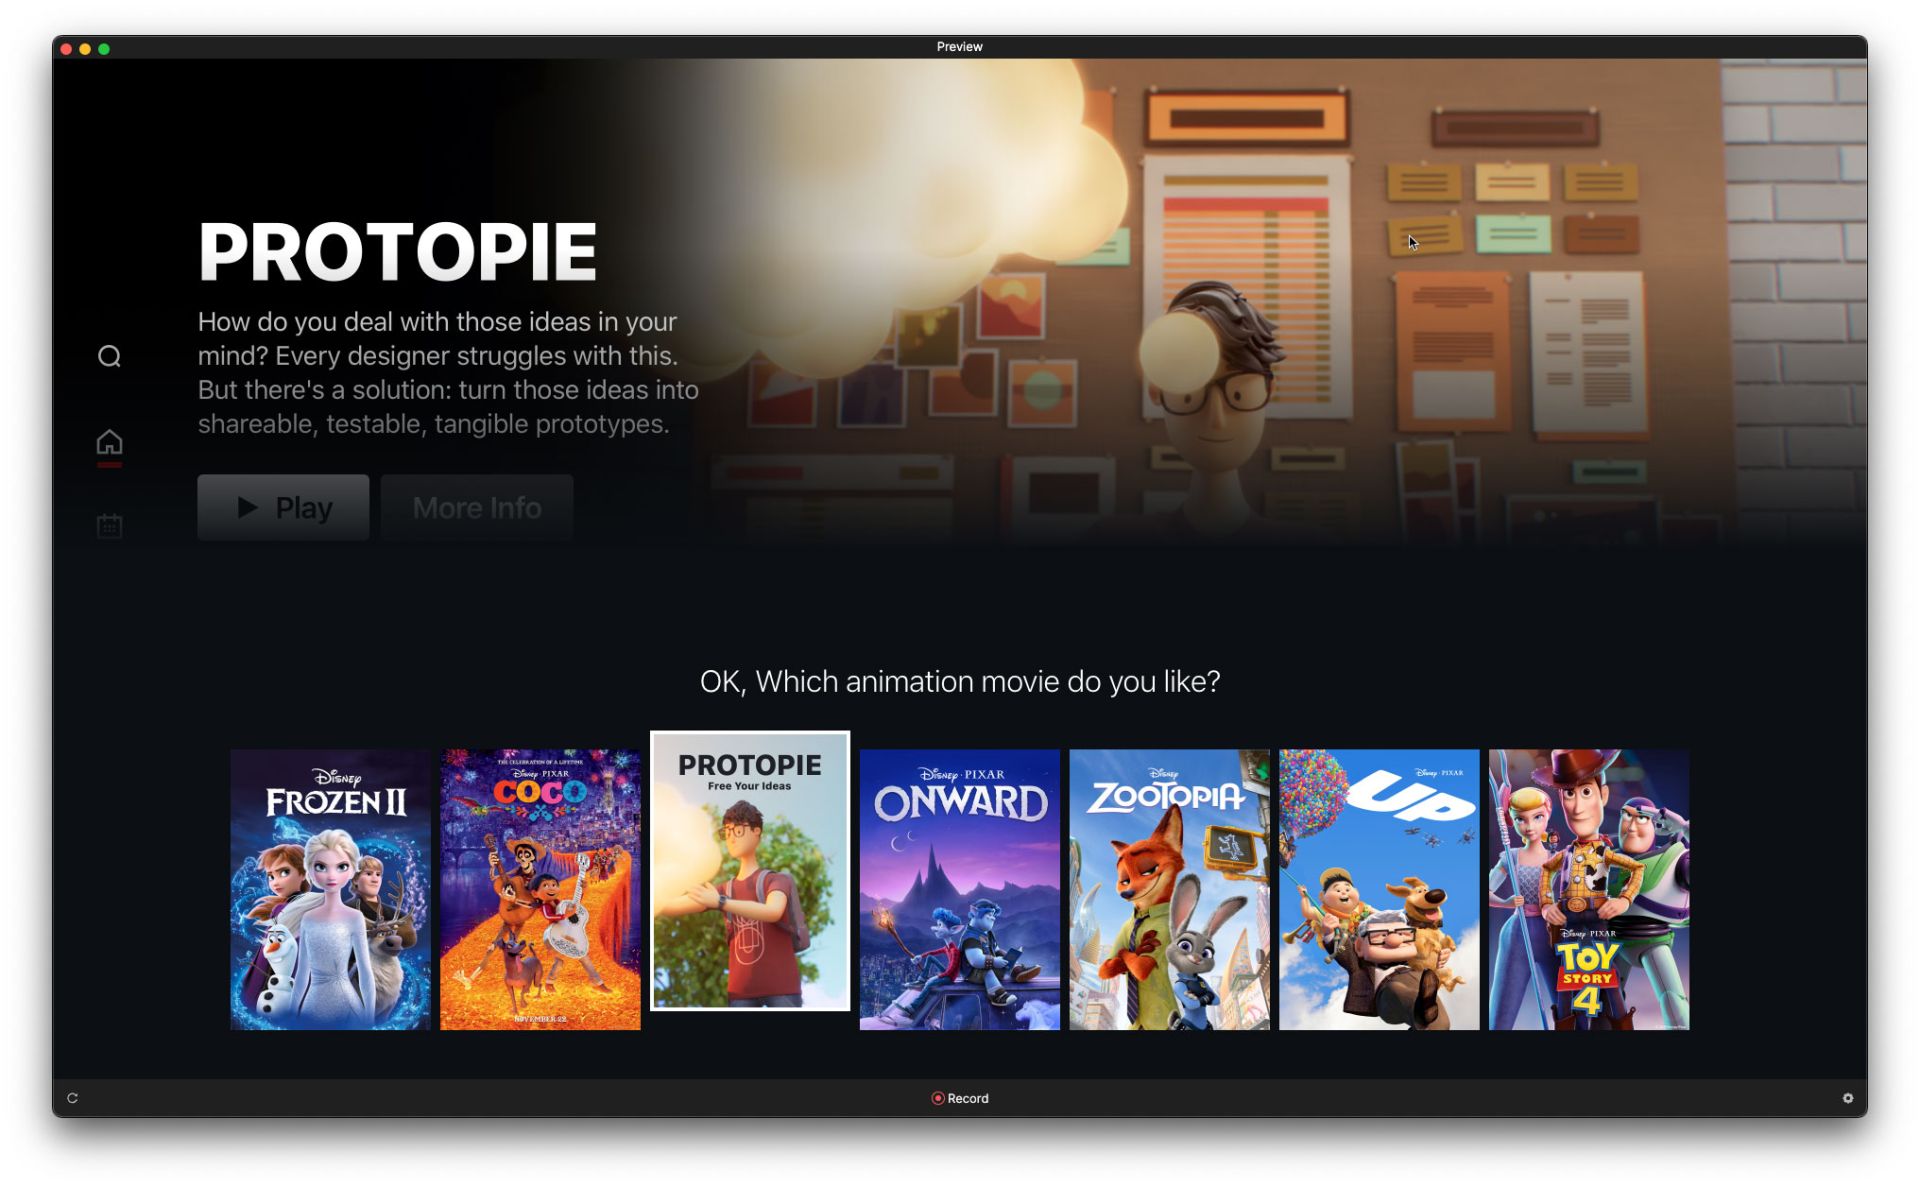
- After making this selection, you are taken to the movie details screen. Pressing Enter will start the movie playback
Setting up the Remote Control
As we see above, we need to map buttons on our remote control to the following keyboard keys:
- V
- LEFT ARROW
- RIGHT ARROW
- ENTER
I’m using an old Sky satellite TV remote control for this. As I mention above, you can use ANY IR remote control.
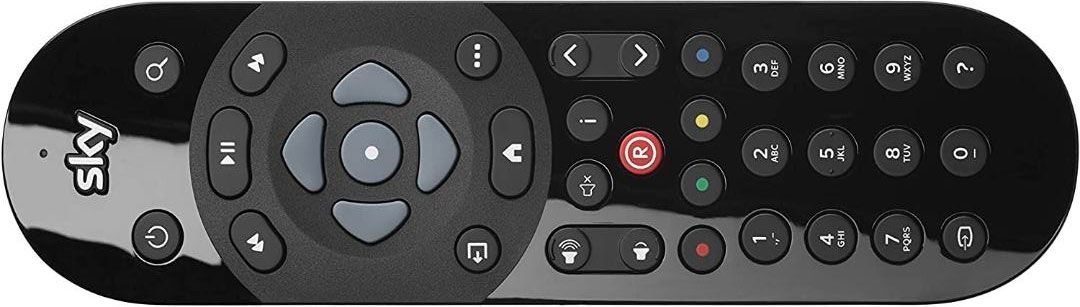
I'll be using this remote control.
We use software provided by FLIRC in order to create this mapping. Downloaded it here:
https://flirc.tv/products/flirc-usb-receiver
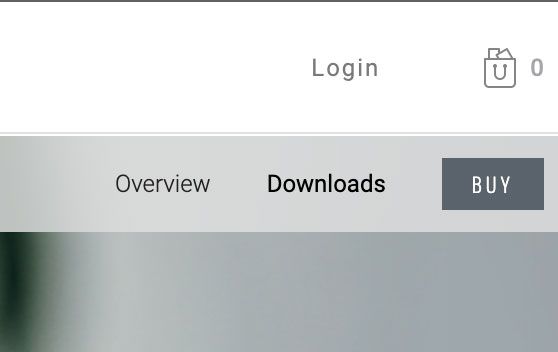
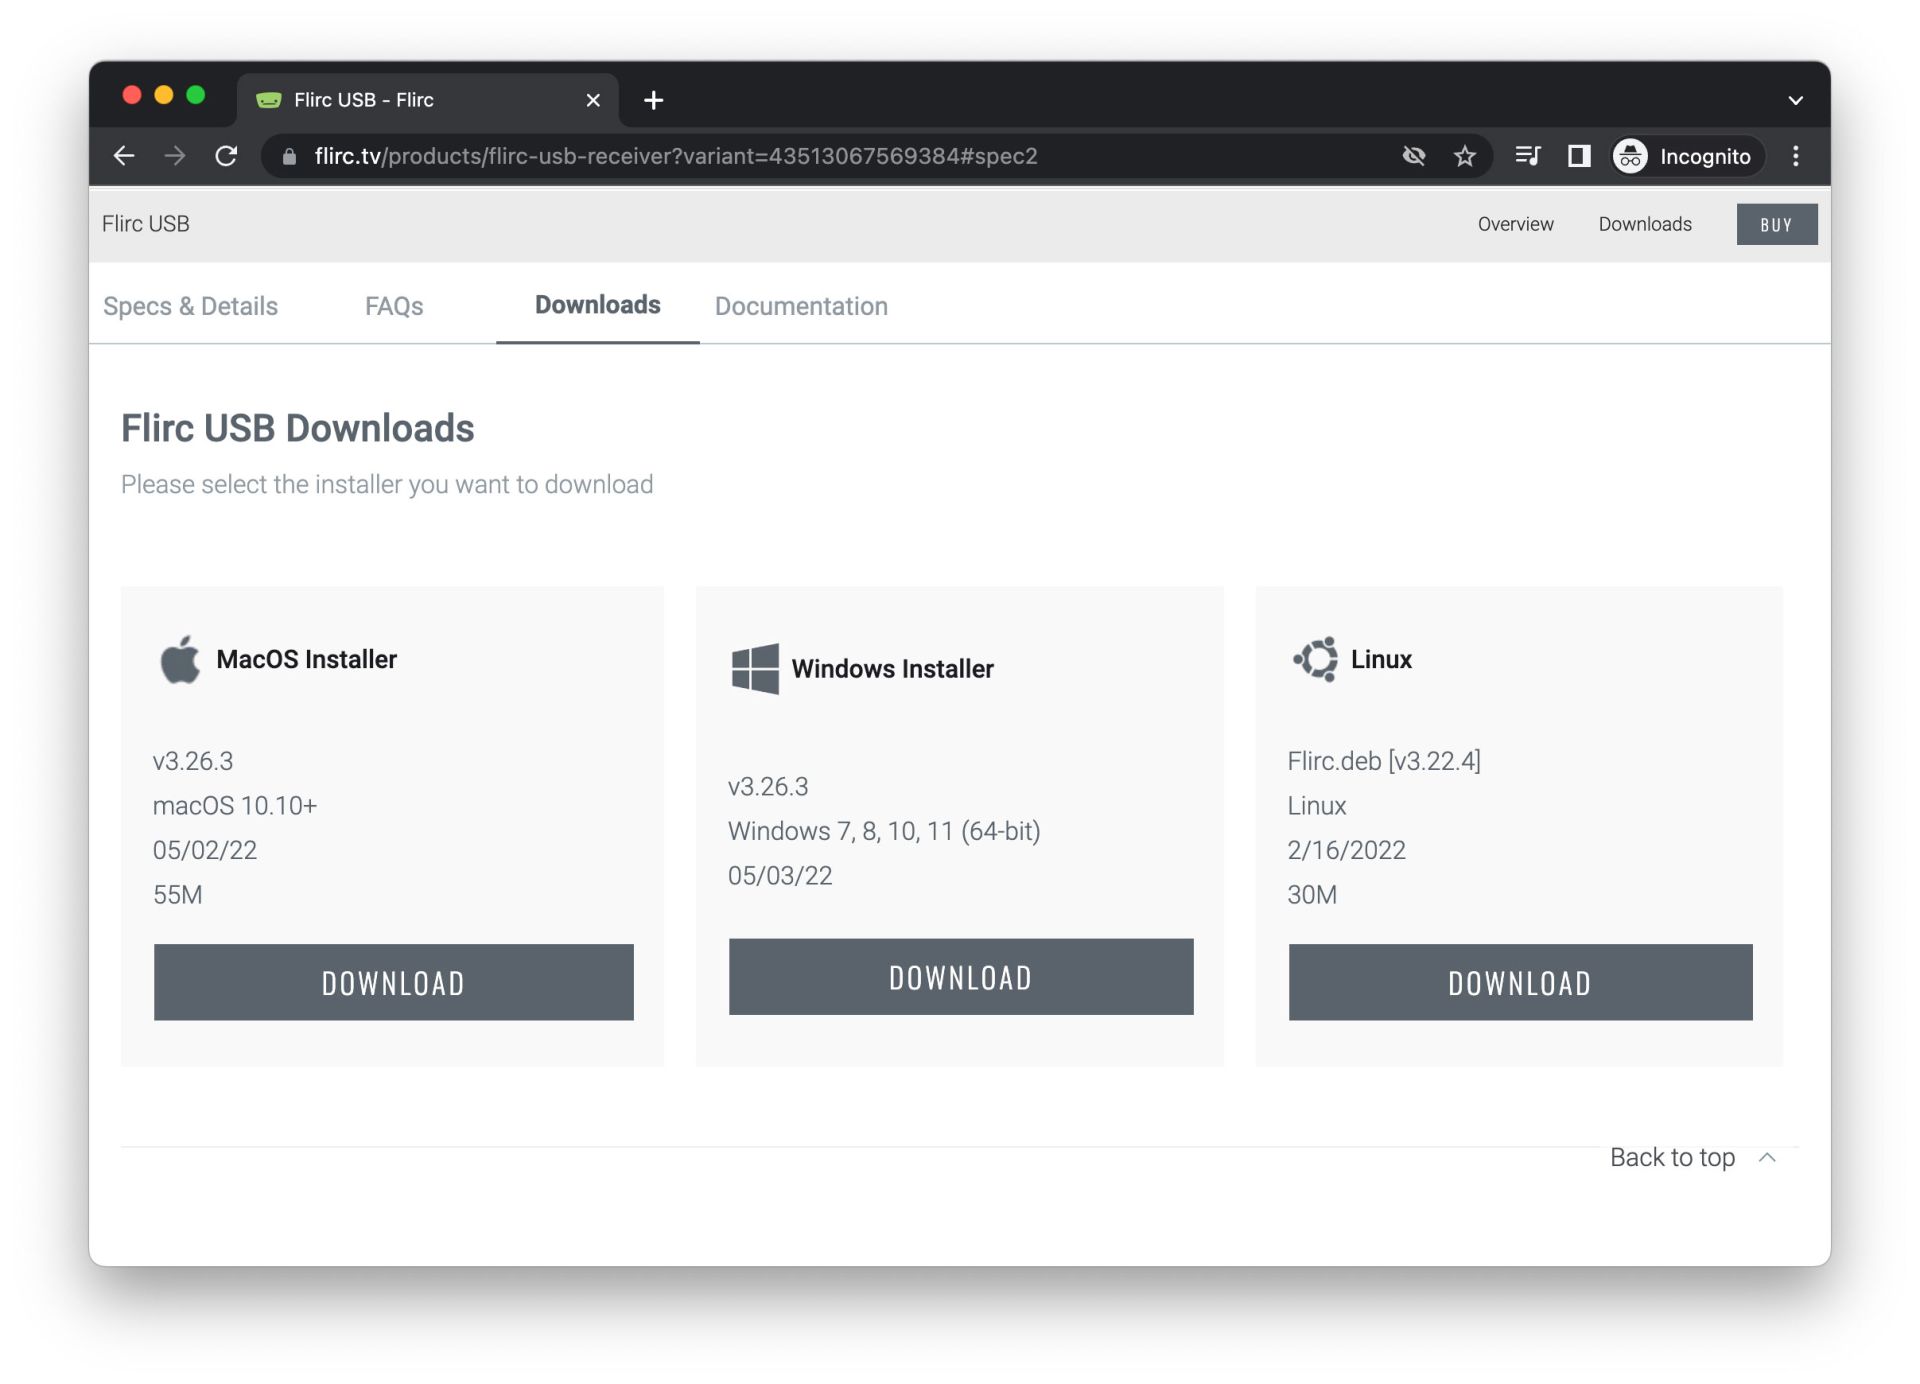
Click the “Downloads” link near the top right, or scroll all the way down near bottom of the page. You’ll find download links for macOS, Windows and Linux.
https://flirc.tv/products/flirc-usb-receiver
Click the “Downloads” link near the top right, or scroll all the way down near bottom of the page. You’ll find download links for macOS, Windows and Linux.
Click "Downloads" in the top-right
One you have it downloaded, install it and run it. You’ll be greeted by this screen:
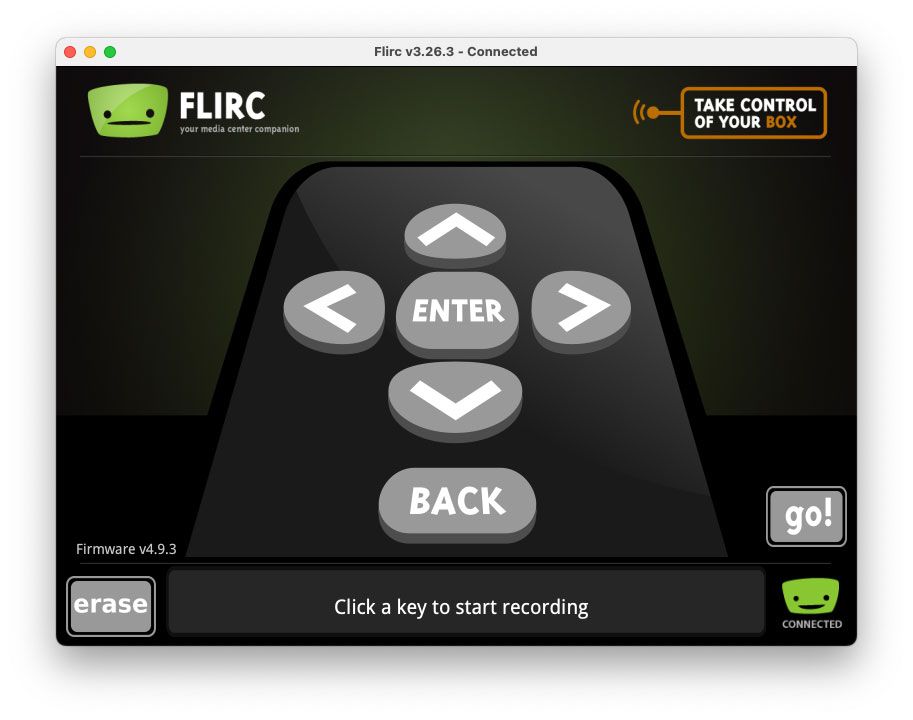
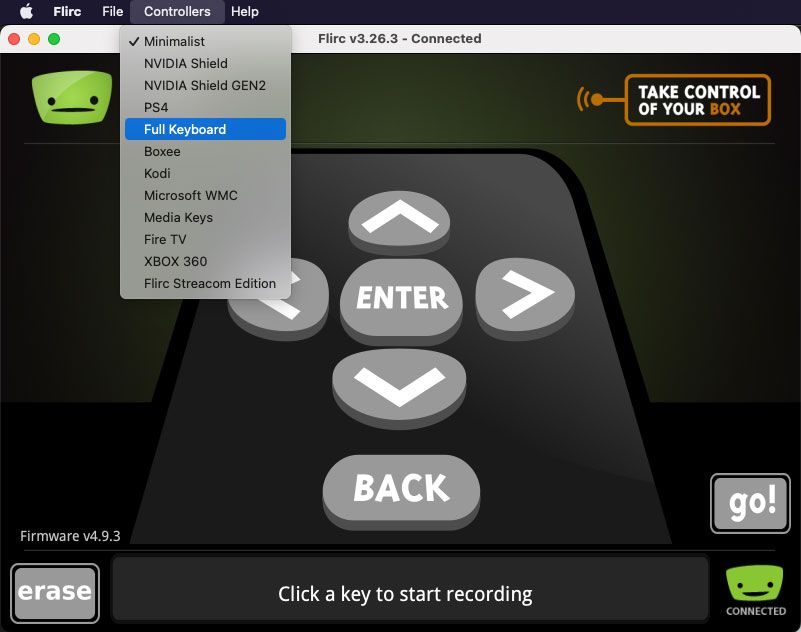
Since we want to work with keyboard key presses, we need to enable the keyboard mapping screen. In the menu go to Controllers → Full Keyboard
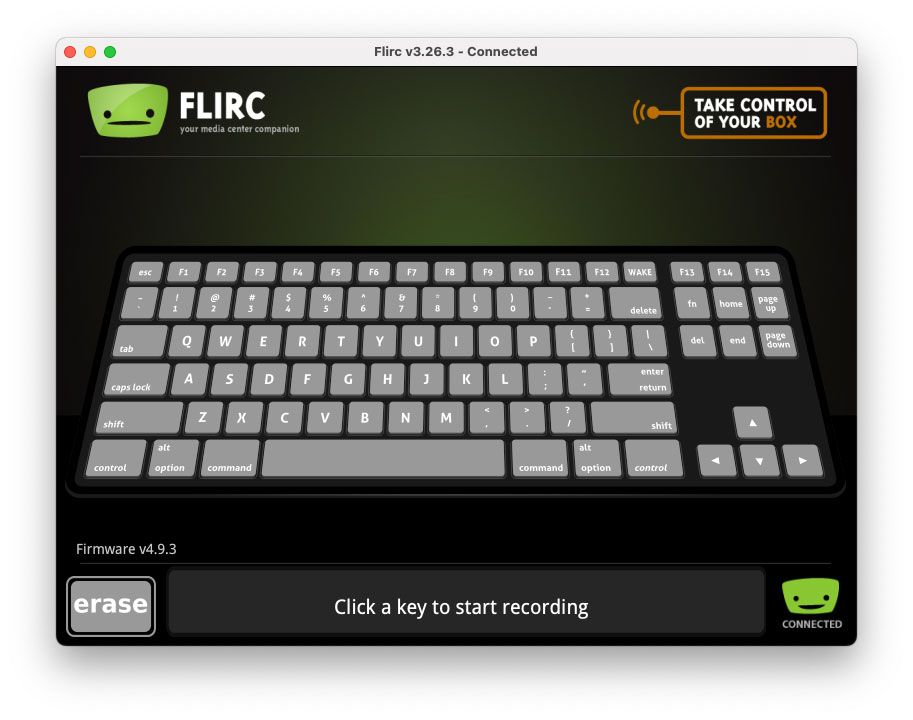
Your display will now look like this:
Now we’re ready to create our mapping. If you haven’t done so already, plug the FLIRC USB receiver into an available USB port on your computer. If your computer has USB-C ports, you can use a USB-A to USB-C converter dongle.
Sounds simple right? That’s because it is.
Let’s start with the Left Arrow.
Mapping works like this:
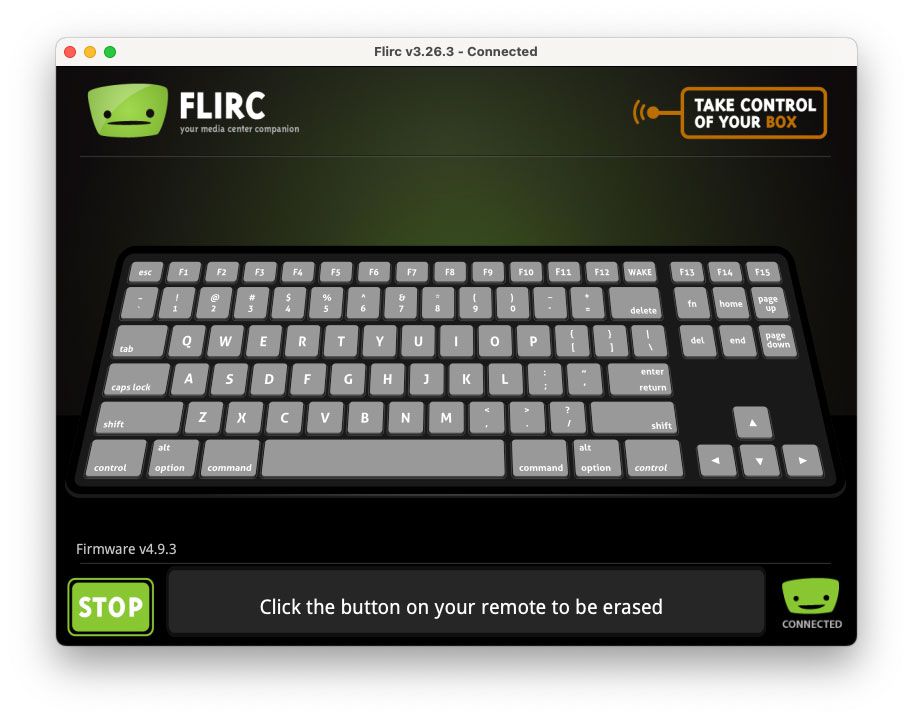
- Click on one of the keys in the keyboard. It will begin to flash.
- Point the remote at the FLIRC receiver and press the button you want to associate with that keyboard key.
- Repeat for each button you wish to map.
Sounds simple right? That’s because it is.
Let’s start with the Left Arrow.
- Click the Left Arrow in the keyboard in the FLIRC software. It should start to flash.
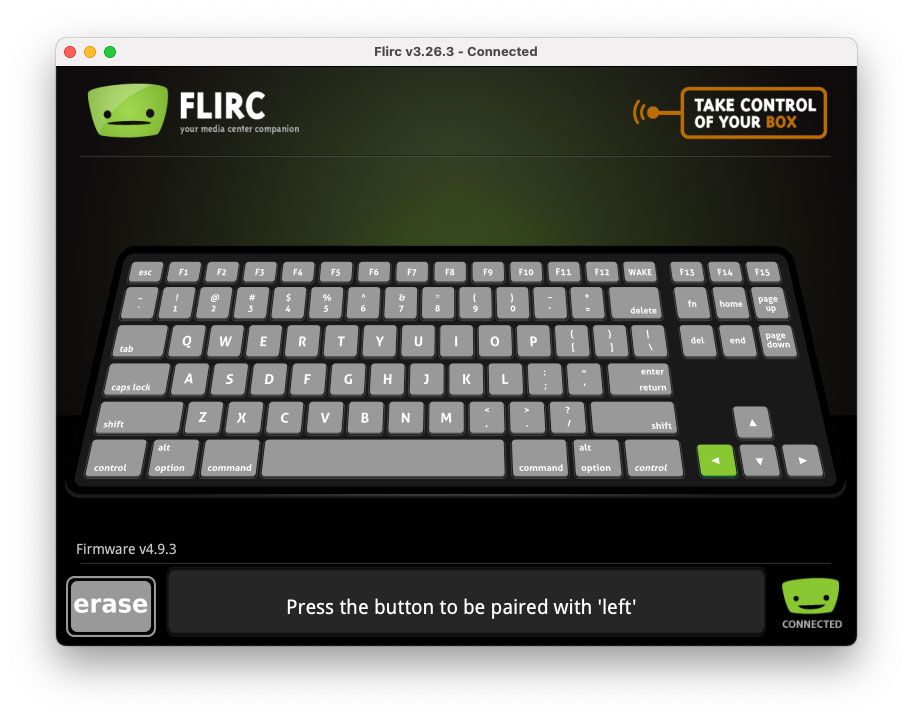
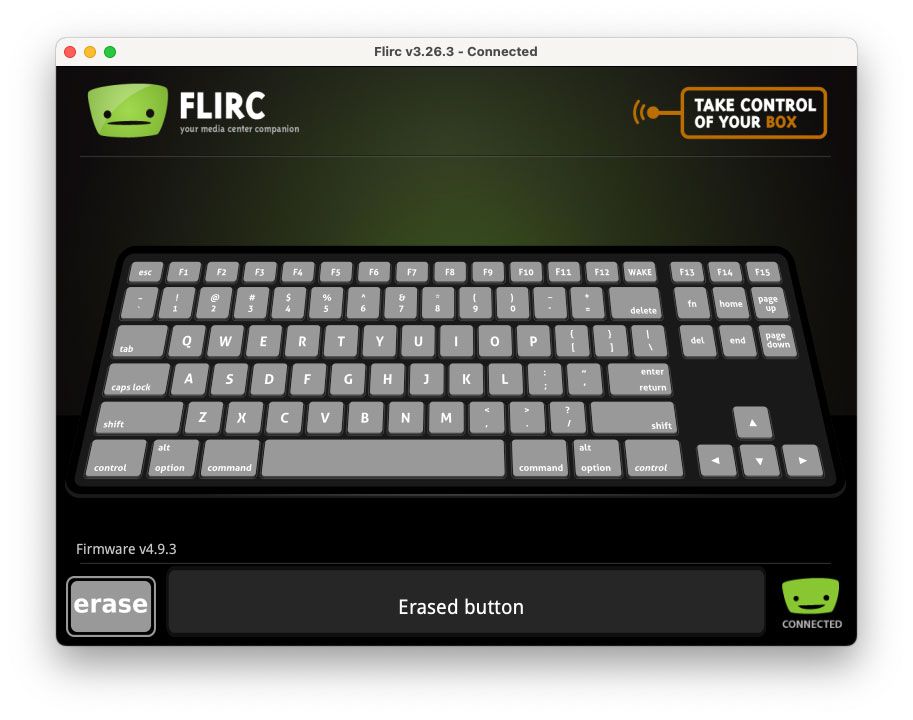
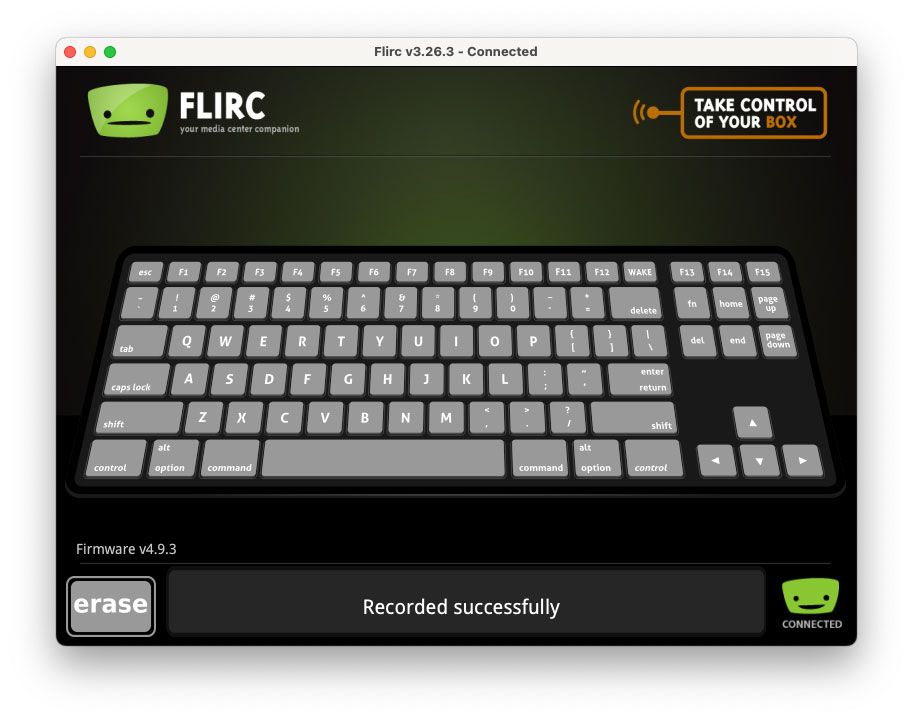
- Point your remote control at the FLIRC receiver. Press the LEFT ARROW button or whatever button you use for left navigation. FLIRC will respond with “Recorded successfully.”

- Verify it worked. Press the LEFT button on your remote control. You should see it flash in the FLIRC software.
That’s all it takes to create a mapping!!
Let’s repeat the above steps for the Right arrow and the Enter key
Verify these steps worked. Press the LEFT, RIGHT and OK buttons on your remote control. You should see them flash in the software.
- Click the right arrow in the FLIRC software
- Point your remote at the receiver and press the RIGHT NAVIGATION button
- Click the enter key in the FLIRC software
- Point your remote at the receiver and press the OK button
Verify these steps worked. Press the LEFT, RIGHT and OK buttons on your remote control. You should see them flash in the software.
Now let’s handle the “V” keyboard key that triggers the voice assistant in the first scene. My remote control doesn’t have a “Voice” or “Microphone” button. But not to worry! You can map ANY button you wish to the “V” keyboard key.
I’m going to use the red “R” button in the middle of the remote. You can choose whatever button you like. Maybe you even have a voice or microphone button on your remote — plenty of TV remotes do!
I’m going to use the red “R” button in the middle of the remote. You can choose whatever button you like. Maybe you even have a voice or microphone button on your remote — plenty of TV remotes do!

Back in the FLIRC software click on the “V” keyboard key. Point your remote at the FLIRC receiver and press whatever button you’ve chosen to be your voice button.
Verify that all four button presses work as expected. If you see the correct keyboard key light up when you press the associated button, you’re done! Your FLIRC has been configured.
Verify that all four button presses work as expected. If you see the correct keyboard key light up when you press the associated button, you’re done! Your FLIRC has been configured.
If you make a mistake…
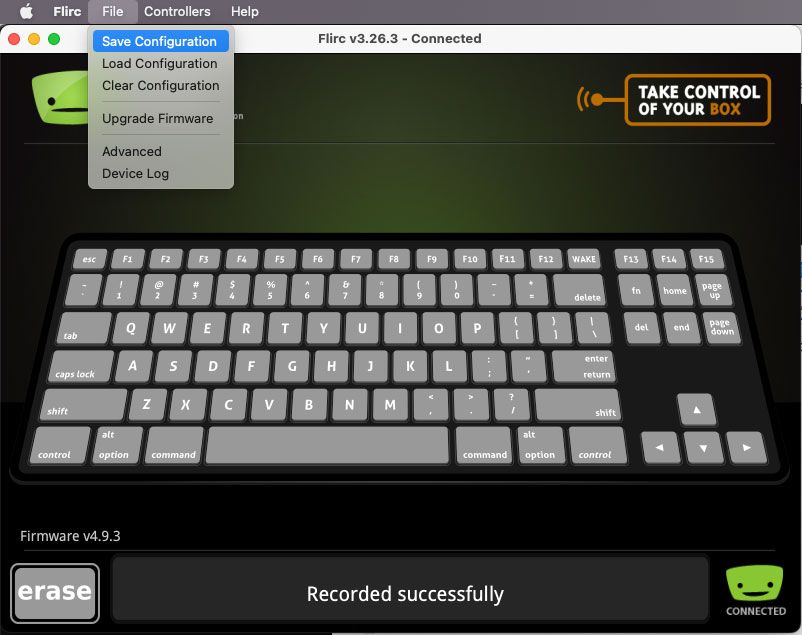
If you make a mistake, it’s easy to undo. Click “Erase” in the FLIRC software, then point your remote at the FLIRC receiver and press whatever button you wish to clear. You can also clear the entire FLIRC configuration and start fresh by selecting File → Clear Configuration.
Let’s see it in action!
Return to ProtoPie Studio and preview. Your remote control should now fully work with your prototype.
Easy as Pie! You’ve just set up your experience to work with a remote control.
In the first scene, press whatever button you associated with the “V” key to start the voice assistant.
Now say “animation” to progress to the next screen. Use your remote control to navigate to the movie named “ProtoPie” and press the OK button.
On the details screen press OK on your remote again. The video should start to play.
Easy as Pie! You’ve just set up your experience to work with a remote control.
This is great! Let’s make it better.
Up until this moment I’ve been focusing on how to configure the remote control, but I’ve glossed over how we author the Pie to respond to keyboard key presses. Maybe you already know how to do this, but if you don’t, follow along!
Let’s make a few revisions to our Pie:
Let’s make a few revisions to our Pie:
- On the video details screen, I’d like to also be able to start playback with the PLAY/PAUSE button on my remote control
- From the video playback screen, I’d like to be able to pause and resume video playback. I’d also like to be able to exit playback and return to the details screen
- From any screen, I would like to be able to return to the starting screen by pressing the HOME button on my remote control.
Add the PLAY button
In ProtoPie Studio, go to the scene named “landing.” Since we already have this scene responding to the ENTER key, we need to use a separate keyboard key to represent pressing the PLAY/PAUSE button.
We COULD map the PLAY/PAUSE button to the Enter keyboard key in the FLIRC software, but then that would mean that the OK button and the PLAY/PAUSE button would always do the same thing. While it works for this scene in particular, we may want to have separate actions in other scenes. For example, during video playback, we might want to have the OK button raise the video overlay, while the PLAY/PAUSE button directly pauses and resumes video playback.
In this scene, we already have a Trigger that responds the the Enter keyboard. Since we want the same action for the PLAY/PAUSE button, let’s duplicate this trigger. Click it and press Command-D (CTRL-D in Windows).
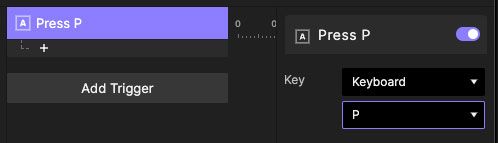
Now modify this trigger to respond to a different keyboard key. I’m going to use the “P” keyboard key to represent Play/Pause.

Let’s rename these triggers so we know at a glance what keyboard keys they are associated with:
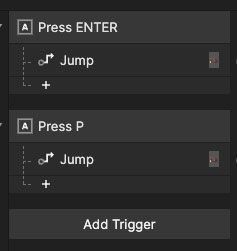
If we preview this scene, it will work if I press the “P” keyboard key on my laptop. But it won’t respond to my remote control’s PLAY/PAUSE button. We need to add it to the FLIRC config.
Add the PLAY/PAUSE button to the FLIRC config
Let’s return to the FLIRC software. Click the “P” keyboard key in the FLIRC UI. Point your remote control at the FLIRC USB receiver and press your remote’s PLAY/PAUSE button. This will add a mapping for the PLAY/PAUSE button to the existing configuration. All of your other button mappings will continue to work just fine.
If we return to ProtoPie and preview our scene again, playback should start when I press the PLAY/PAUSE button on my remote control.
If we return to ProtoPie and preview our scene again, playback should start when I press the PLAY/PAUSE button on my remote control.
Pause and resume video playback
We’ve configured our FLIRC to map the PLAY/PAUSE button to the letter “P” on the keyboard, meaning that we need to continue to use the “P” keypress anywhere we want to respond to the PLAY/PAUSE button.
Let’s head to the scene named “playing.” We want the PLAY/PAUSE button to toggle playback on this screen.
Add a Press Trigger. Configure it to respond to the keyboard key “P.” For good measure, rename the trigger so you know at a glance what keyboard key it is associated with.
Since this will be a toggle, we need to make a decision. If the video is playing, we want to pause. Otherwise if it is paused, we want to resume playback. ProtoPie doesn’t give us a property of the video layer that tells us if the video is playing. So we’ll need to keep track of the playback status in some other way.
Create a variable and name it
Create a variable and name it
playing. This will be a “Number” type variable. When it is set to 1 it means the video is playing, when it is set to 0 it means it is paused. Since our video plays automatically when the scene starts, set the default value for playing to 1.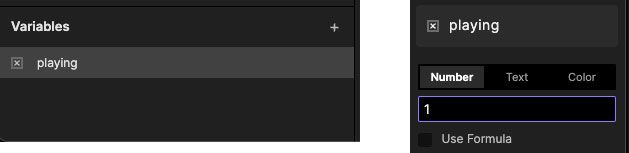
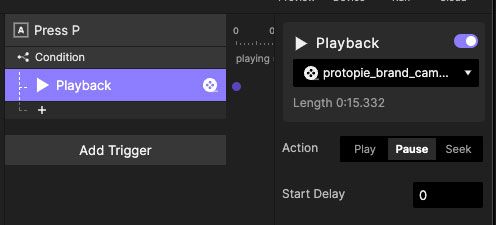
Now let’s go back to our Press trigger. Add a condition. Set it as follows:
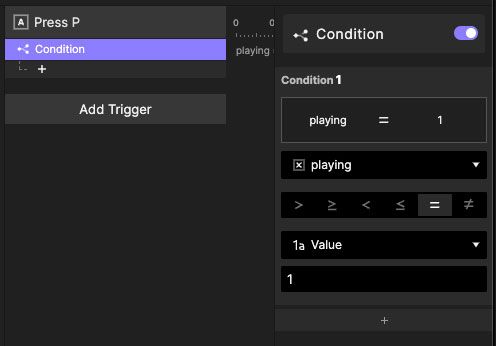
Under this condition, add a Playback response. Set the video to pause playback.
We also need to update our
playing variable to reflect the paused state. Use an Assign response to set the value of playing to 0.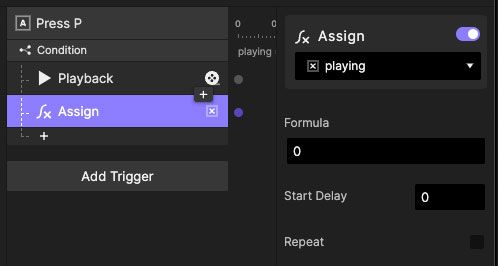
We’ve just configured our Pie to pause the video if it is currently playing. We need a second condition to resume playback if the video is paused. Our condition and responses will be very similar to the ones we just created. So let’s duplicate our condition and modify it. Click the condition you just made, then right-click and choose “Duplicate” (you could also use CMD-D / CTRL-D) on your keyboard.
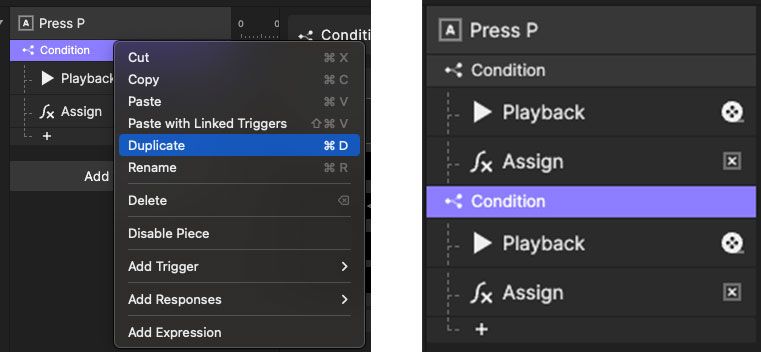
This makes a duplicate of the condition AND all of the responses underneath.
Modify the condition from
Modify the condition from
playing = 1 to playing = 0 as shown: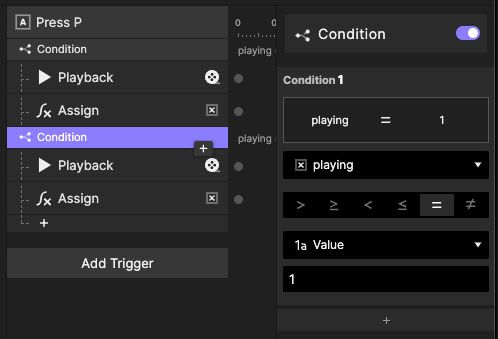
Change from
playing = 1...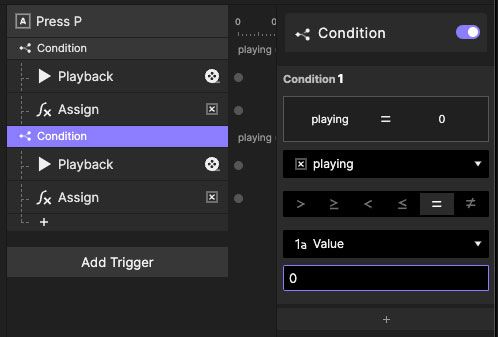
…to
playing = 0.Modify the Playback response underneath, to play the video instead of pause
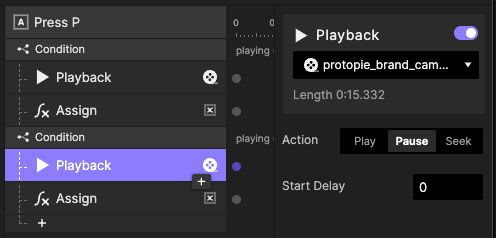
Change from "pause"...
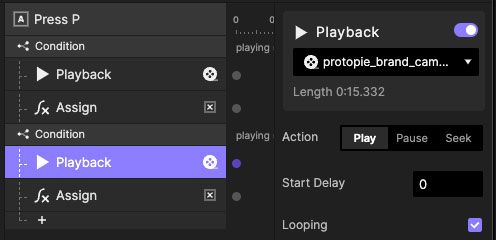
…to “play.” Check “Looping” too
Finally, change the Assign to update the
playing variable back to 1.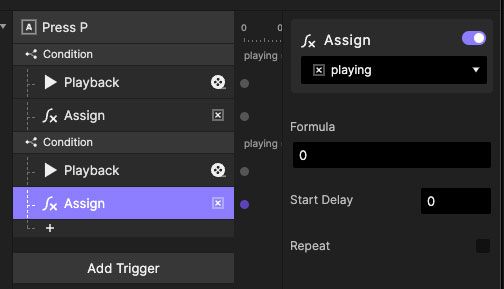
Change this from
0...
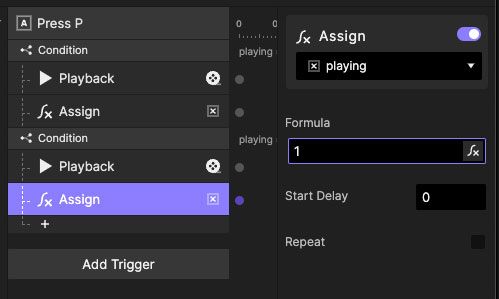
…to
1
We should be able to toggle video playback with the “P” keyboard key. Let’s preview and test this.
What’s more, since we’ve already configured our FLIRC to associate the PLAY/PAUSE button on our remote control with the “P” keyboard key, our remote control should ALSO work now! Go ahead and test that.
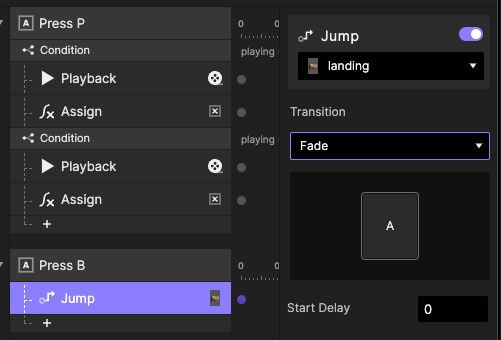
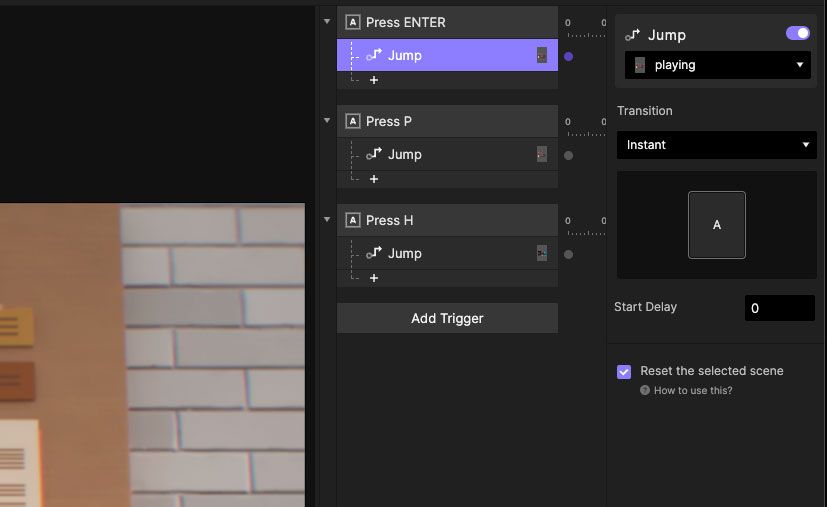
Add the BACK button
From this video playback scene, I’d like to be able to press the BACK or EXIT key on my remote control and return to the previous scene. I’m going to use the “B” keyboard key for this.
Still in the “playing” scene, add another Press trigger, this time associated with the “B” keyboard key. Like before, rename your trigger.

Add a Jump response, and configure it to Jump to the scene named “landing.” Use any transition animation you wish.
We’ll need to change our FLIRC configuration again, but let’s hold off on that. There’s one more action we need to configure.
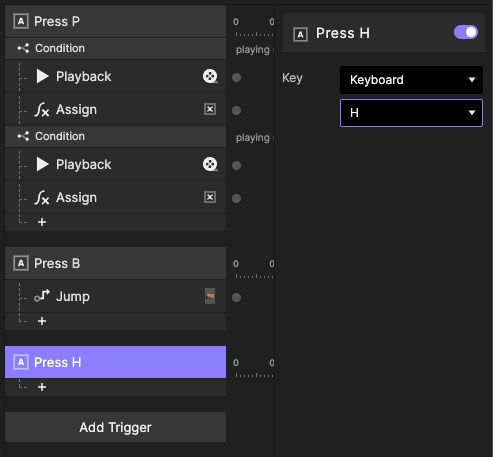
Add the HOME button
I’m going to use the “H” keyboard key to return me to the first scene in the experience.
Still in the “playing” scene, add another Press trigger, this time associated with the “H” keyboard key.
Still in the “playing” scene, add another Press trigger, this time associated with the “H” keyboard key.
Add a jump response and set it to jump to the scene named “initial.” Check the box beside “Reset the selected scene” so that the scene is reset to its initial state. if you don’t see this option, it’s because you have “Smart” chosen for the transition. You need to pick a different transition animation.
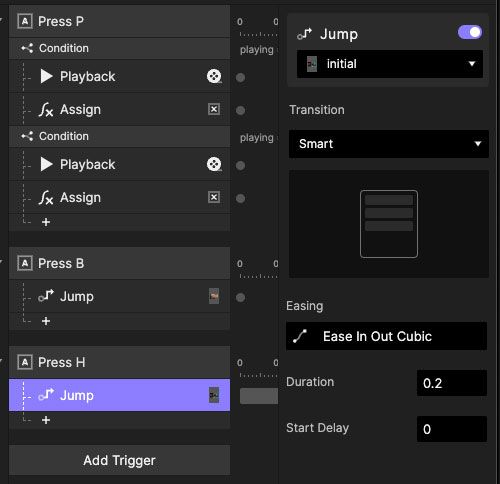
The Smart transition doesn’t give you the option to reset the destination scene.
Any of the other transition options do.
If we preview this, pressing the “H” keyboard key should transition to the first scene.
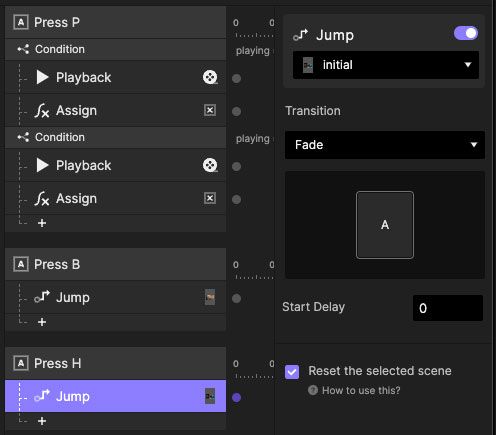
I also want this capability in the “result” scene and the “landing” scene. Copy this trigger and paste it in those scenes.
I also want this capability in the “result” scene and the “landing” scene. Copy this trigger and paste it in those scenes.
Update our FLIRC config to map the BACK and HOME buttons
Head back to the FLIRC software and add mappings for these two keys. Map a button on your remote to the “B” keyboard key to represent BACK/EXIT and map another button on your remote control to the “H” keyboard key to represent HOME. I won’t list the steps here — by now you should know how to do it!
You may notice that if you continue to jump back and forth between scenes, you’re seeing the “result” scene remain in whatever condition you left it. Just like we did for the press “H” trigger to return home, modify the Jump trigger in the “initial” scene so that it resets the “result” scene. You may wish to do the same with the Jump response from the “landing” scene to the “playing” scene.
Let’s go back to ProtoPie studio and preview. You should now be able to fully control your prototype using only your remote control — just like a real TV experience!
You may notice that if you continue to jump back and forth between scenes, you’re seeing the “result” scene remain in whatever condition you left it. Just like we did for the press “H” trigger to return home, modify the Jump trigger in the “initial” scene so that it resets the “result” scene. You may wish to do the same with the Jump response from the “landing” scene to the “playing” scene.
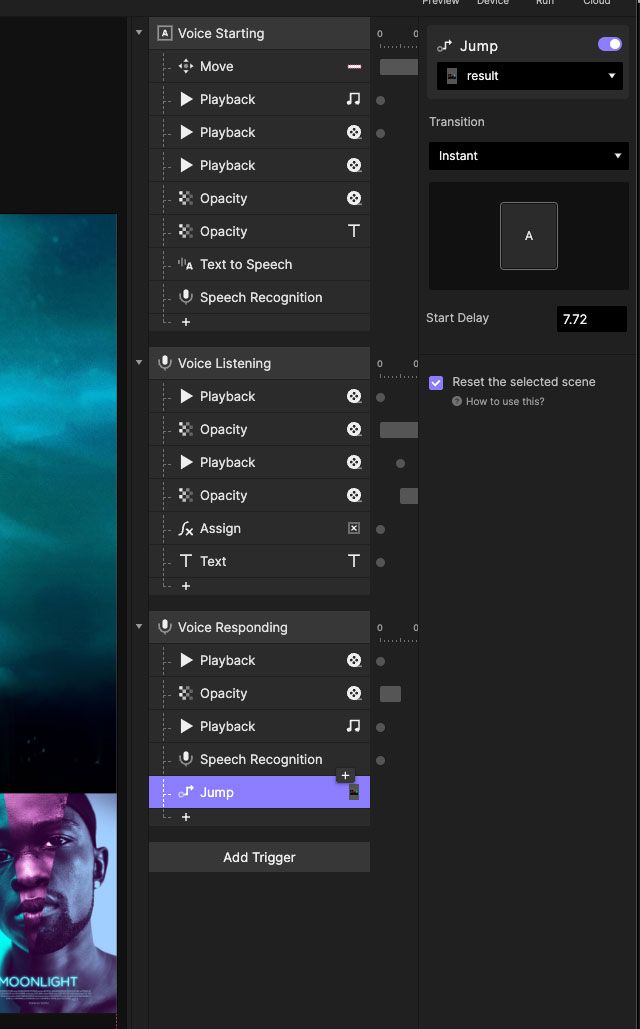
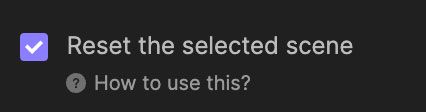
Checking “Reset the Selected Scene” forces it to restart when you jump to it.
That's it! Your Pie is complete
Here’s a finished version of the Pie file:
Some closing notes
The FLIRC configuration you create will work with the specific model of remote control you used when creating the mapping… so if you have several of the same remote control model, you only need to configure the FLIRC once and it should work with each one.
But you’ll need to create a separate configuration for a different model remote control. Even different remote models from the same manufacturer will likely need separate configurations. You can save time by creating a mapping once for each remote model, then saving the configuration for retrieval later.
But you’ll need to create a separate configuration for a different model remote control. Even different remote models from the same manufacturer will likely need separate configurations. You can save time by creating a mapping once for each remote model, then saving the configuration for retrieval later.
I can then load the configuration for the particular remote model I intend to use instead of remapping all of my remote buttons.
Create a config for every button on your remote control and save it. That way all of of your buttons are ready to use. As long as you use the same keyboard associations from one Pie to the next, your remote configuration will be infinitely reusable.
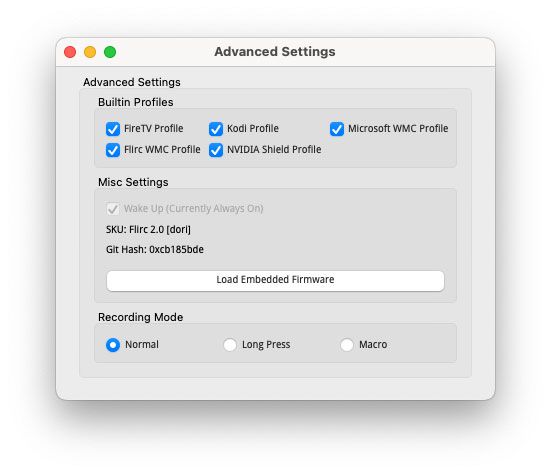
Long Press
The FLIRC software supports mapping a long press to a key. In this way you can use two different actions with the same button. One for a short press, and a different one for a long press. To configure a Long Press, go to File → Advanced.
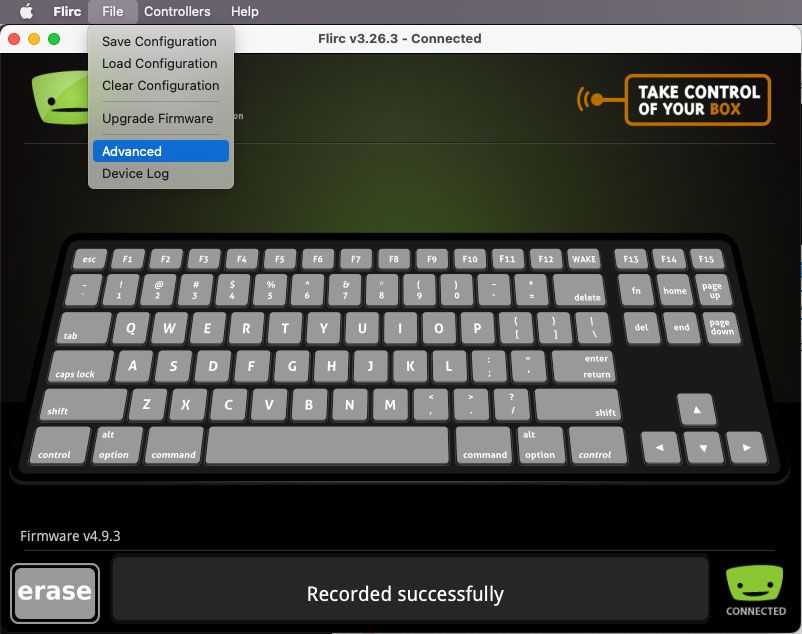
This will allow you to change the recording mode. Choose “Long Press.”
Now make a mapping like you did before. but choose a keyboard key that you haven’t used yet.
We already have a short-press mapping to the “B” key — that’s what we created above. I’m going to map the long press to “Q.”
With the recording mode changed to “Long Press” click the “Q” keyboard key in the FLIRC UI. Next, point the remote control at the USB receiver and just press the BACK/EXIT key once. DON’T LONG PRESS IT!!! You’re just making the association here, not actually performing a long press.
This will now configure your remote to “press” the “B” keyboard key after a short press, and the “Q” keyboard key if you hold the button down for half a second.
Now in ProtoPie, make two Press triggers. One that responds to the “B” key and another that responds to the “Q” key. You don’t use the Long Press trigger. The long press is handled completely by the FLIRC.
For example, say you wanted the BACK/EXIT key to behave as a backup key for a short press, but on long press you exit out of your journey completely.
We already have a short-press mapping to the “B” key — that’s what we created above. I’m going to map the long press to “Q.”
With the recording mode changed to “Long Press” click the “Q” keyboard key in the FLIRC UI. Next, point the remote control at the USB receiver and just press the BACK/EXIT key once. DON’T LONG PRESS IT!!! You’re just making the association here, not actually performing a long press.
This will now configure your remote to “press” the “B” keyboard key after a short press, and the “Q” keyboard key if you hold the button down for half a second.
Now in ProtoPie, make two Press triggers. One that responds to the “B” key and another that responds to the “Q” key. You don’t use the Long Press trigger. The long press is handled completely by the FLIRC.
Sometimes this doesn’t work properly
Sometimes when you try to set up the long press, all you get are just multiple short press commands repeating over and over again while you hold the button down. This happens then the button you’ve mapped naturally repeats on holding it down. Volume control buttons are a good example of this.
You can fix this by teaching FLIRC that the button naturally repeats. Here’s how to do it:
- Go to File → Advanced and set the Recording Mode back to Normal
- Erase the mapping for the button. Click Erase in FLIRC’s UI. Point your remote control at the USB receiver and press the remote control button you want to clear. We were using the BACK/EXIT button in our example, so let’s continue to use that.
- Recreate the mapping to the “B” key but this time when you record the remote control button, keep holding the button down until you see “Recorded Successfully” in FLIRC’s UI
By holding the button down, the code will repeat. FLIRC will recognize this and set this up as a non-repeating button instead. This will now allow us to map a long press action to the button.
- Go to File → Advanced and set the Recording Mode to “Long Press.”
- Record the mapping for “Q.” No need to hold down the remote control button this time. A single short press will work.
Now in your Pie your two separate Press triggers for “B” and “Q” should operate on short press and long press respectively.
Understand that by doing this, you lose the natural ability of the remote button to repeat. Also note that the short press will now have a bit of a delay. You need to release the remote button before the FLIRC will decide if it’s a long press or a short press. This may lead to your experience feeling a little less responsive than it did before. So only use this work around when you actually need separate actions for short press and long press on the same button.
Quick Start
Fundamentals
ProtoPie 101
by Industry
© 2025 Studio XID. All rights reserved.